Video Overlay Controller
This handy web-based tool allows you to customise your video stream of your favourite video conferencing software (e.g. ZOOM, Teams, Webex, GotoMeeting). Learn how to use it in your meetings.
Content
1. Overview
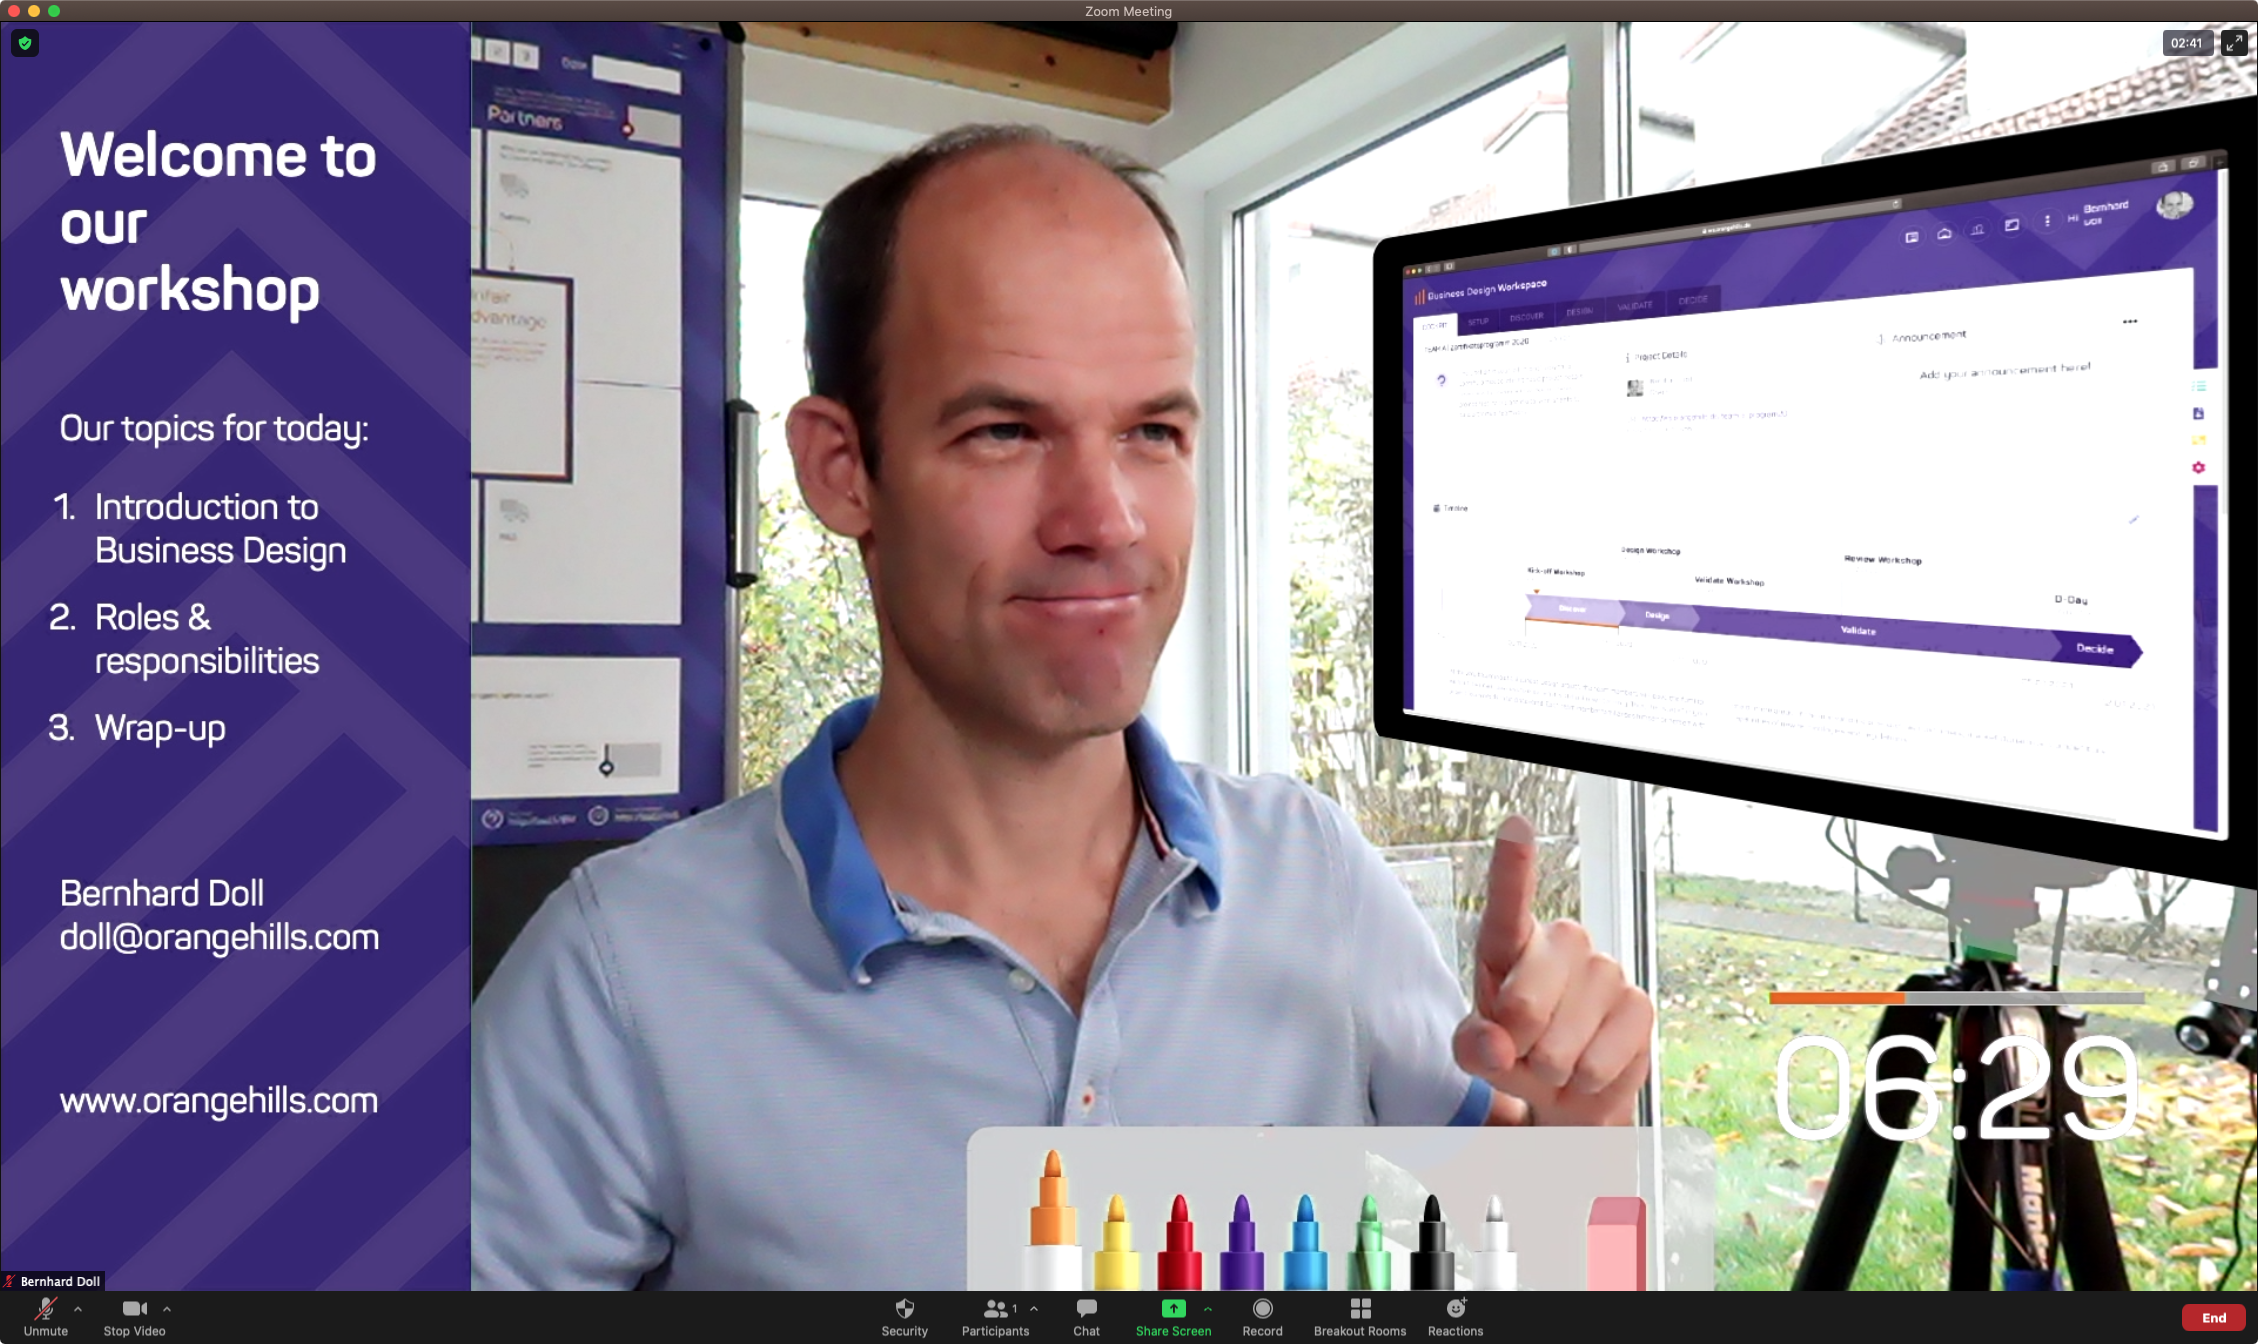
We have developed the software for our own trainings (and partly workshops) to provide the participants a typical "Orange Hills" feeling and allow more engaging and interactive virtual sessions. The first link provided below is for instructors and the second for participants of your video calls:
Keep in mind that this tool is not a commercial product and for INTERNAL USE ONLY. The use of the software is at your own risk.
2. Features
The basic features of the software are:
Feature | Description |
System | |
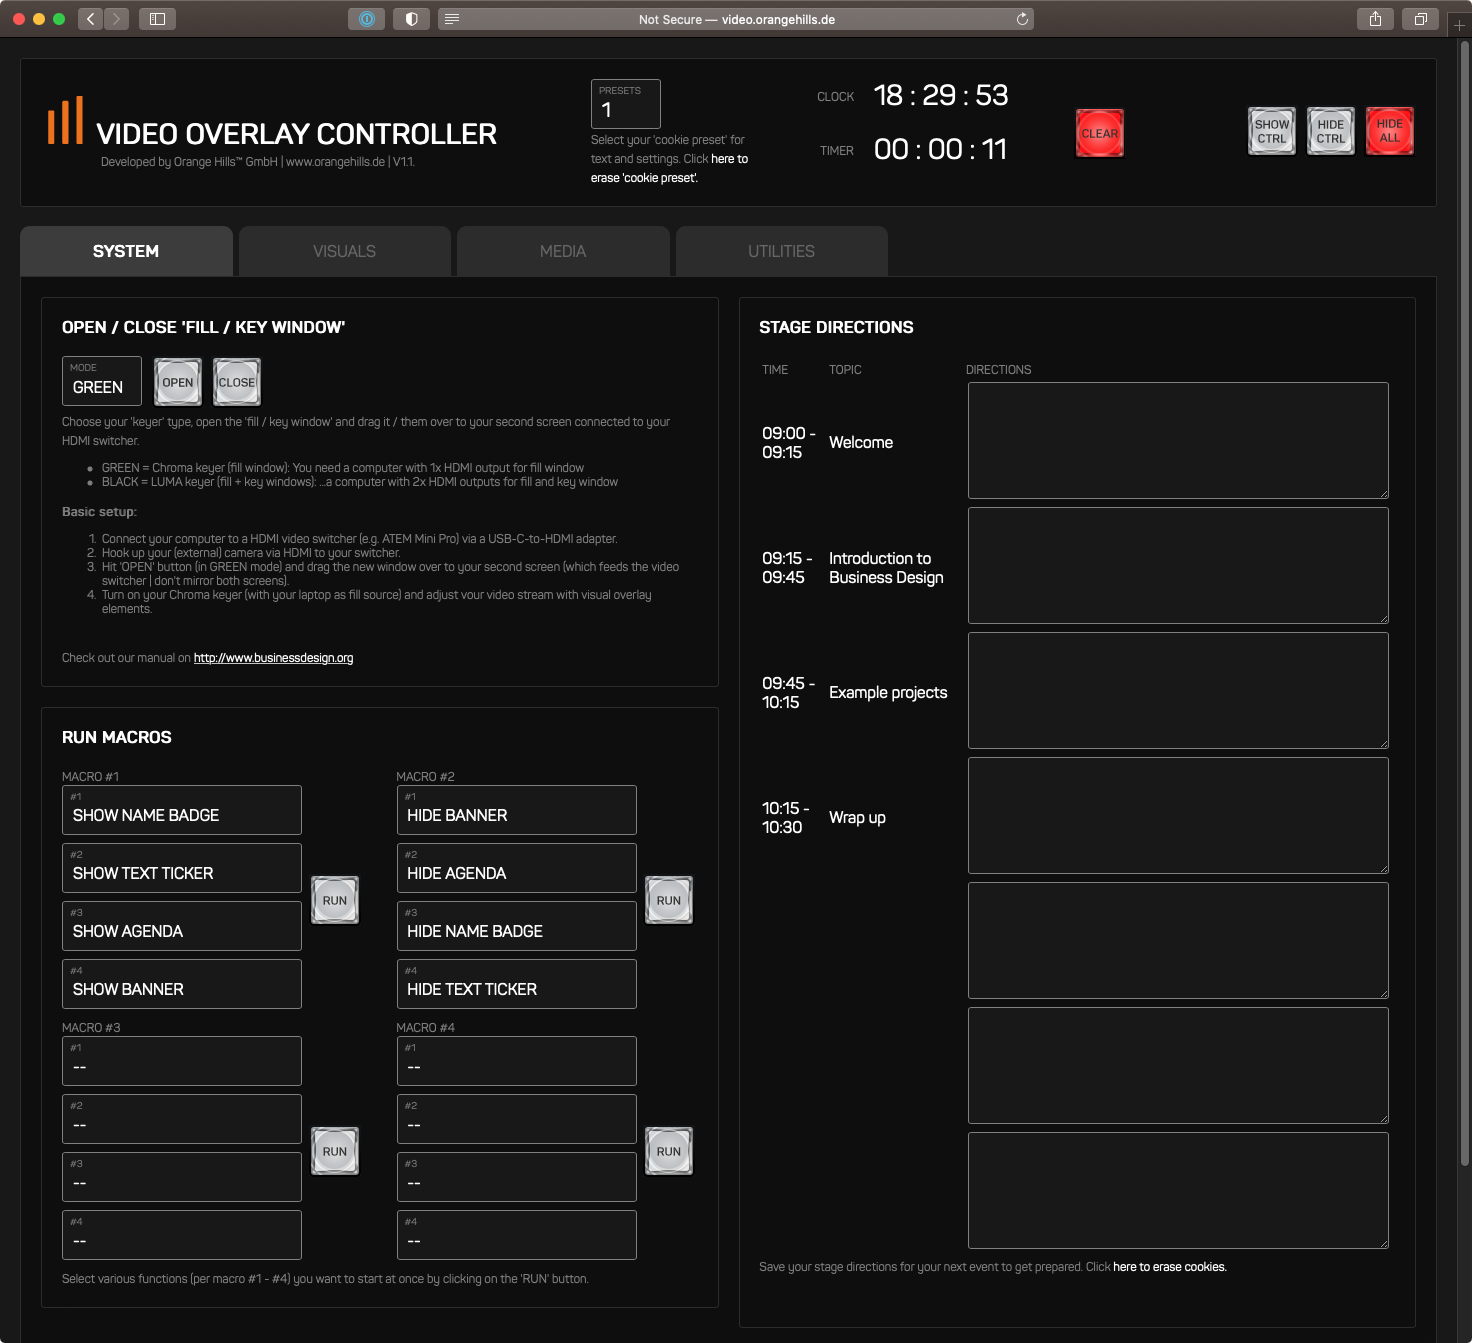
OPEN / CLOSE 'FILL / KEY WINDOW' | Choose your 'keyer' type, open the 'fill / key window' and drag it / them over to your second screen connected to your HDMI switcher (e.g. Blackmagic Design ATEM Mini).
|
WINDOW DRAWING MODE | Allows you to turn your video screen into a simple drawing board. Move your mouse to your second / video screen and start drawing. The keyboard shortcut CTRL + D allows you to toggle this feature on and off. |
MACROS | Allows you to show / hide various visual elements at the same time with one mouse click. This features comes in handy, if you want to switch from one "scene" to another in your workshop or training, say from your welcome note (with banner and agenda opened) to an introduction to Business Design (showing the process and guiding principle X). We hope that most of the labels in the pulldown menus are self-explanatory. E.g.
HINT: You can also start a macro with the keyboard shortcuts CTRL + <macro_nr> (1-4) |
STAGE DIRECTIONS | A little table for you to jot down notes for your instructions and reminders throughout your session. "Time" and "Topic" items are automatically copied from your agenda (see VISUALS). |
Visuals | |
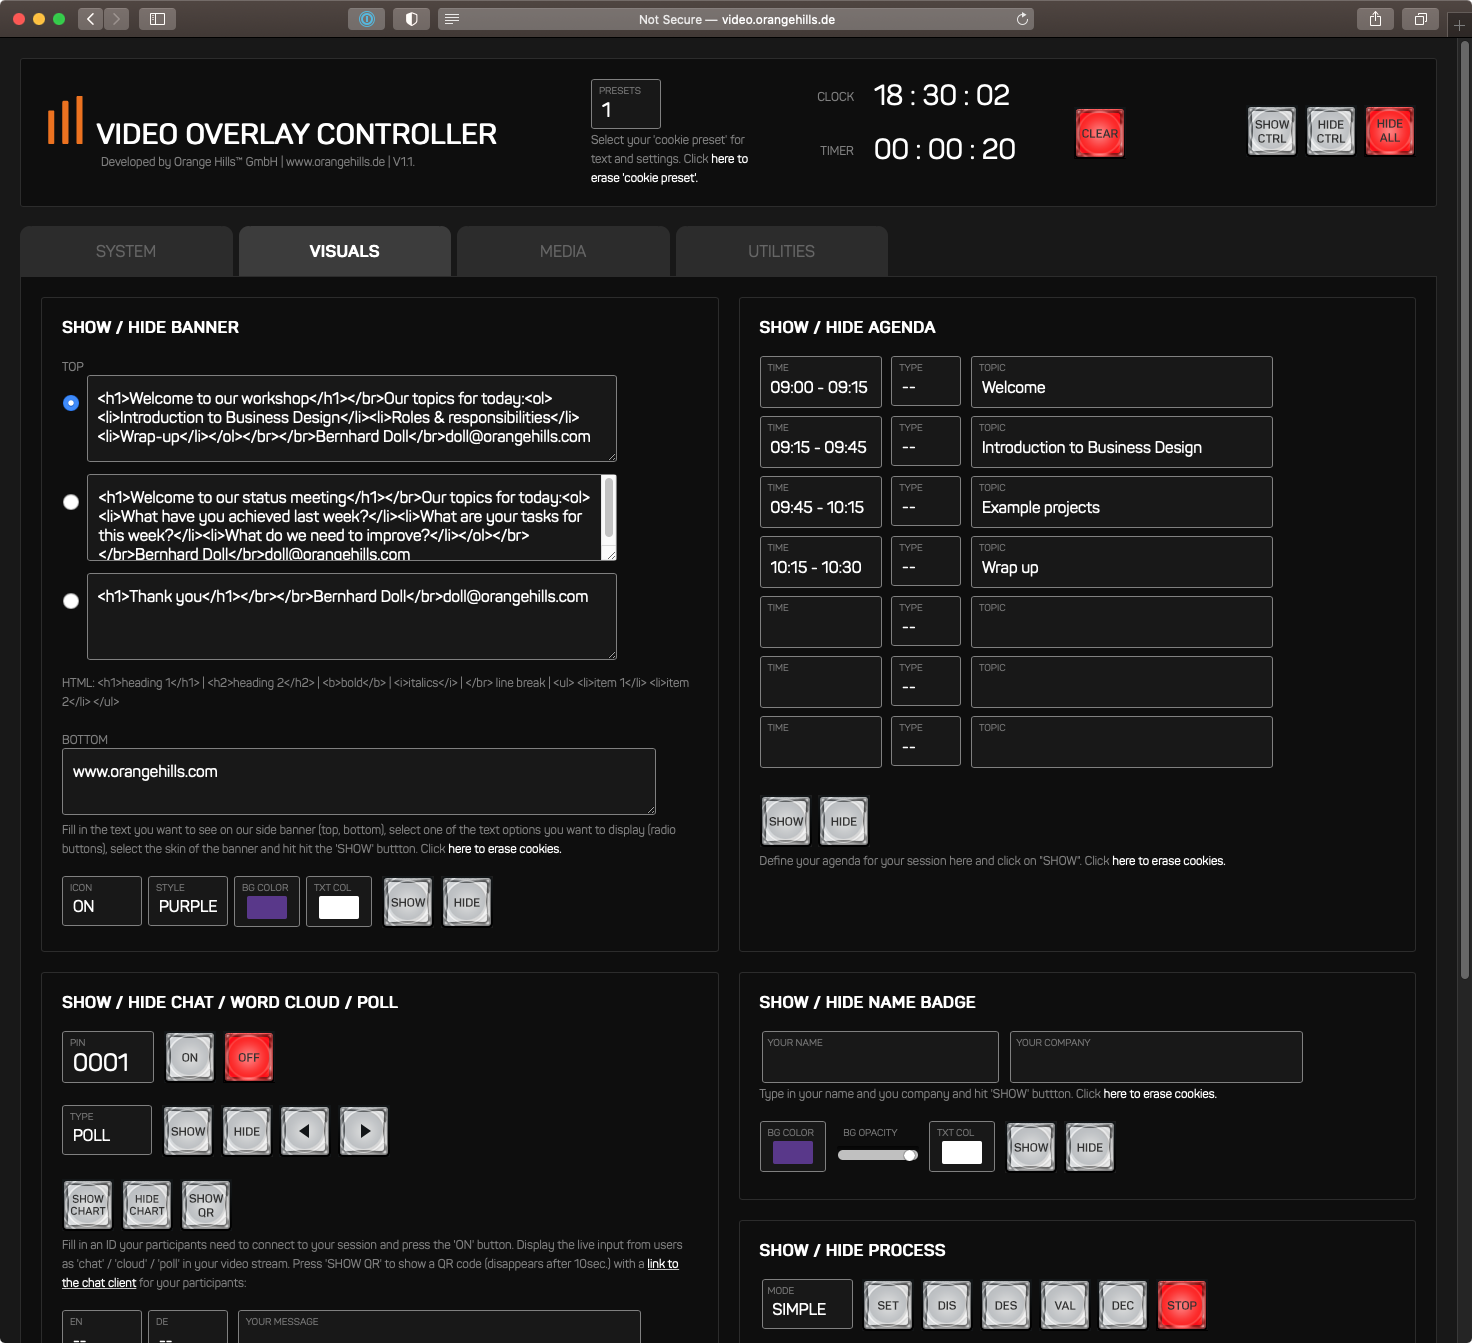
SHOW / HIDE BANNER | Displays a banner on the left side of your screen and puts text on it (e.g. welcome note, key topics, agenda, contact details etc.). The following attributes can be adjusted:
You can prepare three different text elements that you want to show throughout a session. Click on the corresponding radio button and hit "SHOW" to show your text on screen. You are also able to upload your own icon. Simply click on the "SHOW CTRL" button in the header bar and then on one of the cog wheels that show up on your video screen. |
SHOW / HIDE NAME BADGE | Shows a simple name badge / "lower third" with your name and company at the bottom of your screen. The following attributes can be adjusted:
|
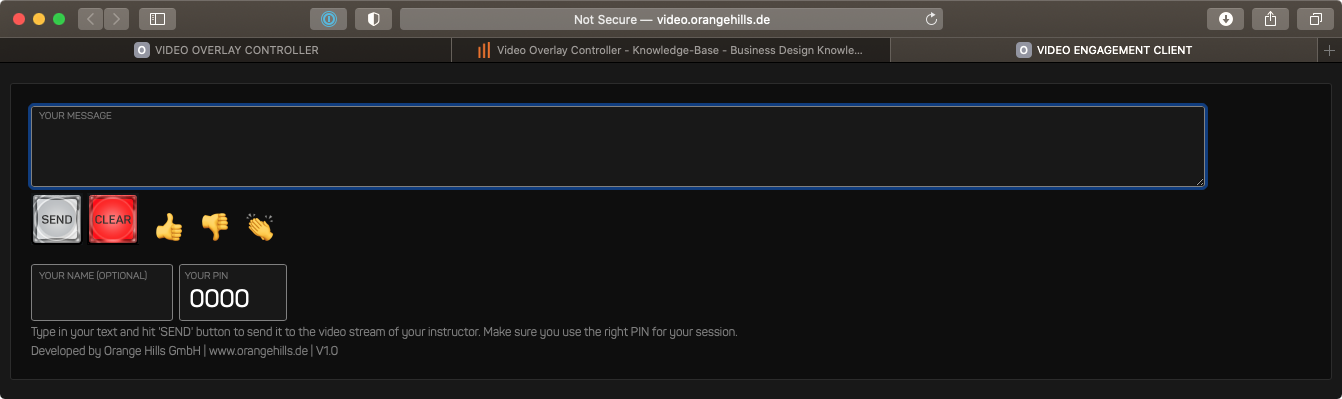
SHOW / HIDE CHAT / CLOUD / POLL / CARDS | Provides a panel on the video screen that shows real-time messages from yourself and your participants. Use this function for simple ad-hoc polls, quizzes or interactive discussions. Your participants can use their smart phones (http://video.orangehills.de) as a second screen to interact with you during a session. We love it! You can choose from two modes:
HINT: The pin provided in the little input field ("0000") is important for your participants to connect to your session. Hit the "QR CODE" button and provide your participants a seamless experience to connect: They just need to hold their smart phones (with camera on) in front of their screens, record the QR code and get redirected to the pre-configured client. Done. |
SHOW / HIDE ("Business Design") GUIDING PRINCIPLES | Shows the famous" Business Design" magnetic shapes...nothing fancy but helpful for short "Business Design" introductions. HINT: You can even position the shape on your video screen with your mouse (drag & drop). |
SHOW / HIDE AGENDA | Shows a simple agenda for your session (seven items max. with time, type and topic). |
SHOW / HIDE ("Business Design") PROCESS | Shows a very basic "Business Design" process at the bottom of your screen. You can highlight each phase by pressing the following buttons:
|
Media | |
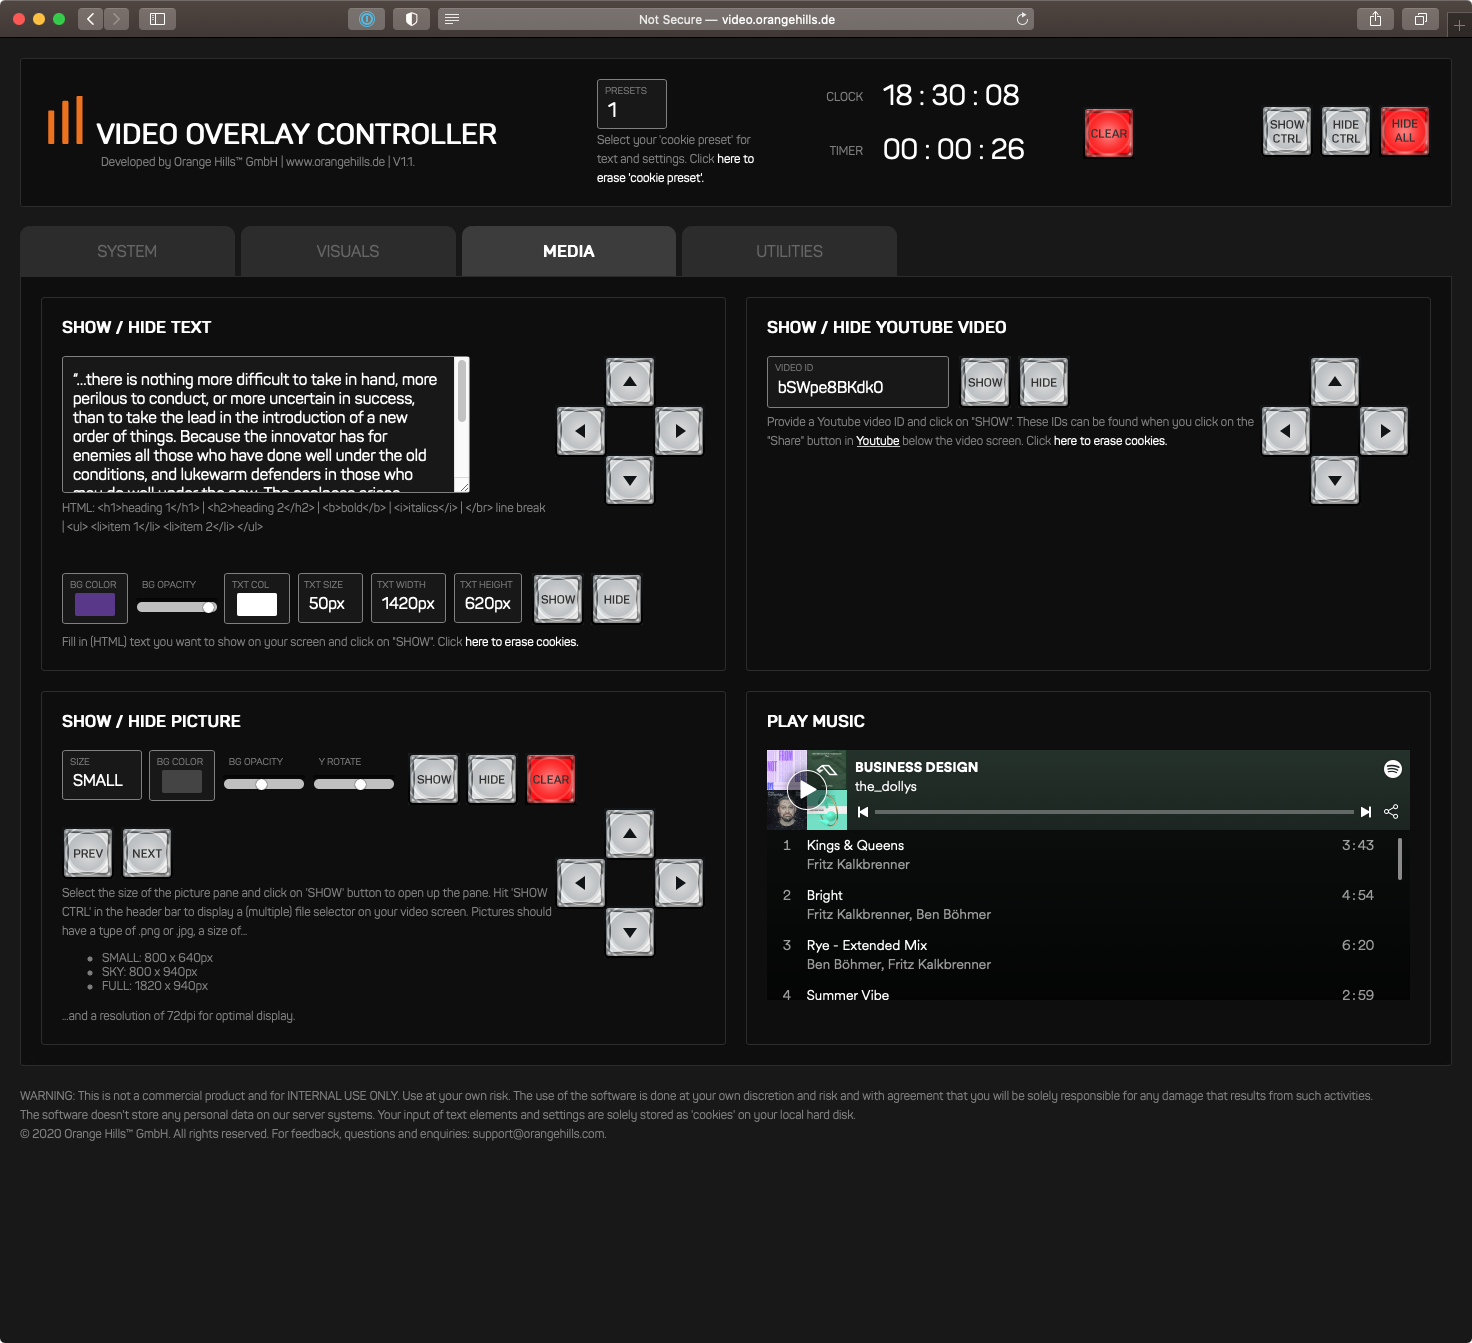
SHOW / HIDE TEXT | Allows you to overlay a customizable text with a pretty large font size over your entire screen. The following attributes can be adjusted:
|
SHOW / HIDE IFRAME | Shows a simple iframe in different sizes (see SHOW / HIDE PICTURE for more details). Be aware that not all web resources allow it to be displayed within an iframe (X-Frame-Options). |
SHOW / HIDE PICTURE | Shows a white panel on your screen that allows you to select image files from your computer to be displayed on your video screen. You can choose from three sizes:
Use the cursor buttons to move the panels around. This panel can also be repositioned with cursor buttons and a slider allows you to adjust the color and opacity of the background from 0 to 100% and rotate the picture canvas by 30 degree to the left and right. Click on "SHOW CTRL" in the header bar to display a (multiple) file selector and select your files from your hard disk. HINT: You can even position the picture canvas on your video screen with your mouse (drag & drop) and drag files from your hard disk right onto the picture canvas. It is that simple. |
SHOW / HIDE YOUTUBE VIDEO | ...similar to "Show / hide picture" but for video content. Works only with Youtube. You need a Youtube ID of a video to load and show it.. These IDs can be found on Youtube below the videos ("Share" button). HINT: You can even position the canvas on your video screen with your mouse (drag & drop). |
PLAY MUSIC | Here, we have embedded a Spotify playlist with great tunes we love to play at the beginning of a session or during breaks. |
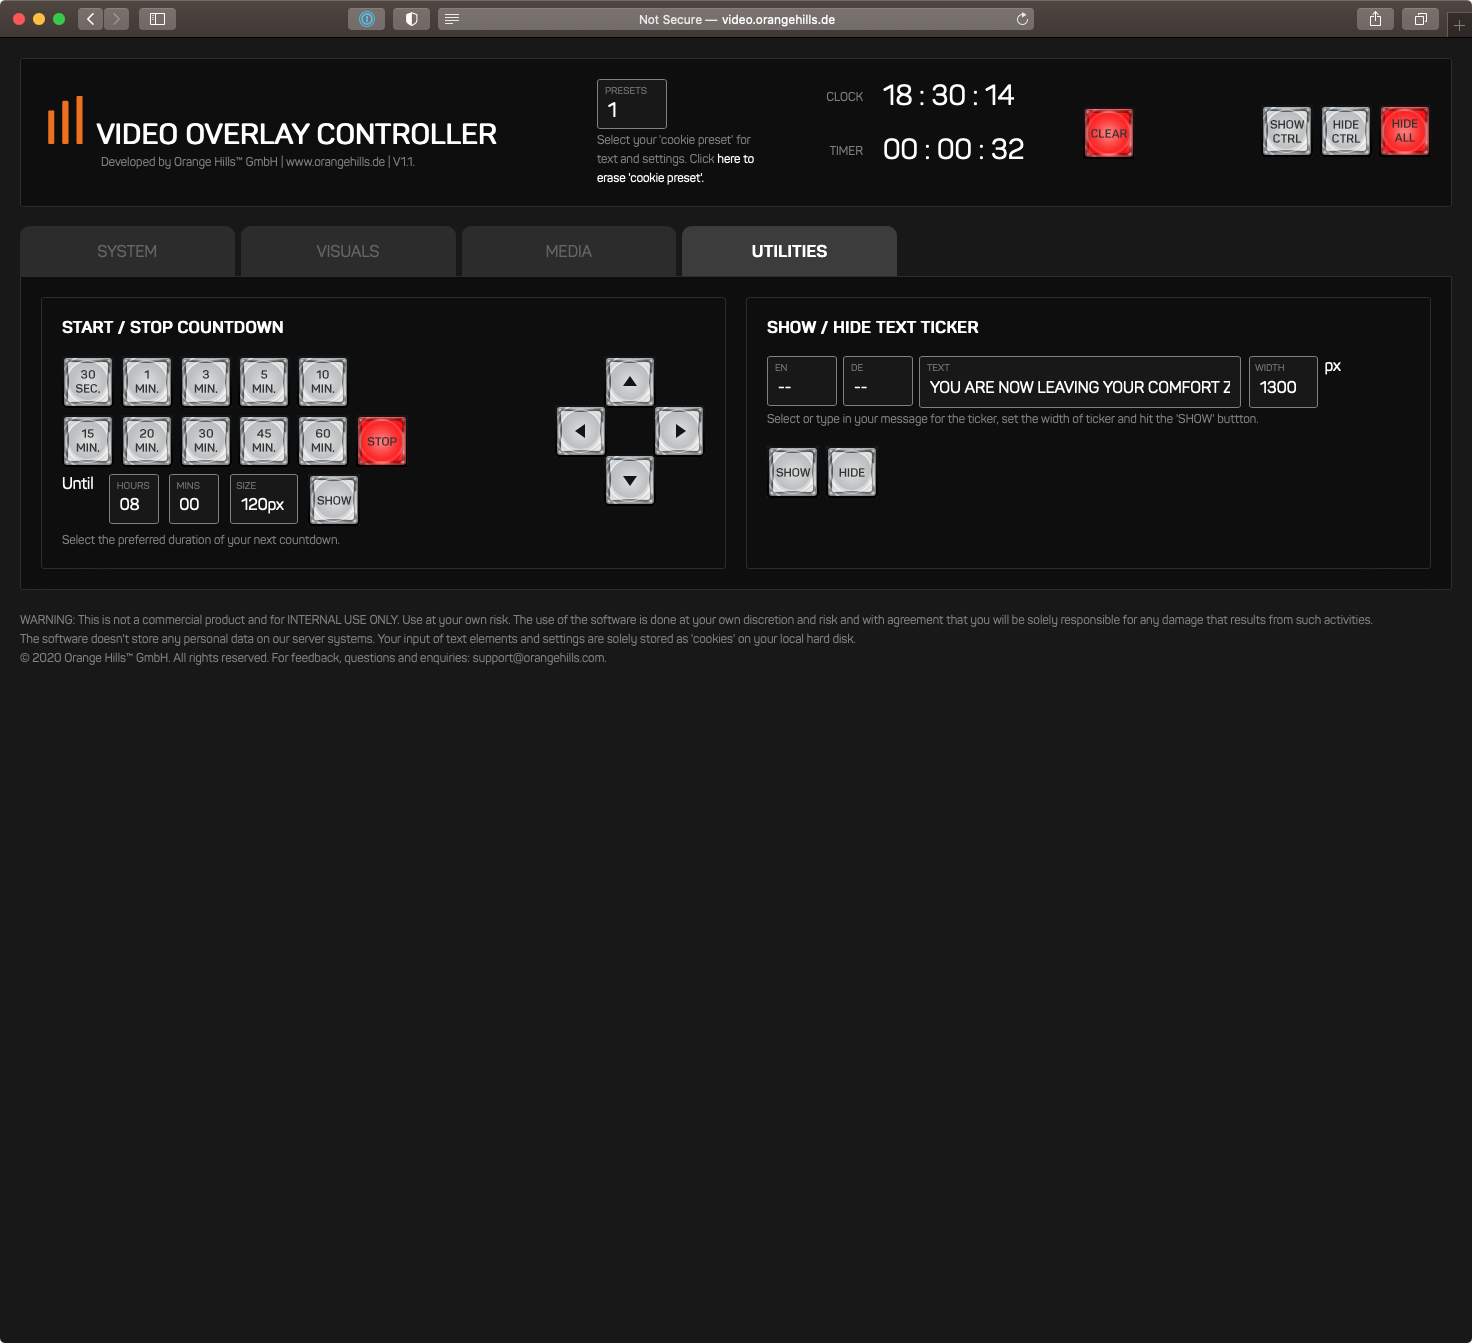
Utilities | |
SHOW / HIDE TIMER | Displays a timer counting backwards from X min to 0. The timer will be displayed at the bottom right corner of your screen. This element can be repositioned on your screen with the cursor buttons. Same here: You can even position the timer on your video screen with your mouse (drag & drop). |
SHOW / HIDE TEXT TICKER | Shows a simple text ticker with content you have filled into the input field. |
In the header bar of the "Video Overlay Controller", you find a simple pulldown menu named "PRESETS". Here you can change between three preset settings for all your text and adjustments. Simply change the preset, adjust your text, and everything will be automatically stored into the current preset 1, 2 or 3. Great feature if you want to prepare different "virtual" workshops at the same time. | |
KEPP IN MIND: This is not a commercial product and for INTERNAL USE ONLY. Use at your own risk. The use of the software is done at your own discretion and risk and with agreement that you will be solely responsible for any damage that results from such activities. The software doesn't store any personal data on our server systems. Your input of text elements and settings are solely stored as 'cookies' on your local hard disk.
3. Example Output
4. Instructor View
5. Participant view
6. Instructions for Setup
You need a basic setup to get the software up and running:
Computer with your video conferencing software
HDMI video switcher (e.g. Blackmagic Design ATEM Mini) with a LUMA or Chroma keyer and connected to your computer via USB
USB to HDMI adapter to connect your computer to the HDMI switcher (your second screen)
External video camera that is also connected via HDMI to your switcher
Please follow the steps below:
Start your video conferencing software and select the HDMI video switcher as camera source
Open the Video Overlay Controller on http://video.orangehills.de/admin and open the "fill window" (GREEN mode)
Drag the "fill window" with your mouse over to your second screen (left or right side of your main screen). Make sure your screens are not mirrored and the second screen is set to 1080p (HD)!
Set the "fill window" to fullscreen
Turn on the Chroma keyer of your HDMI video switcher, fed by the HDMI input that is connected to your computer (second screen)
Voila. Now you can show / hide the different functions and visual elements introduced before.