Tools for Virtual Collaboration
To support teamwork across locations, countries and even continents, we gradually transfer (specific) physical meetings along the Business Design Process into the virtual world with the help of tools. Here is a list of tools we use in our (home) offices on a daily basis.
Content
1. Overview
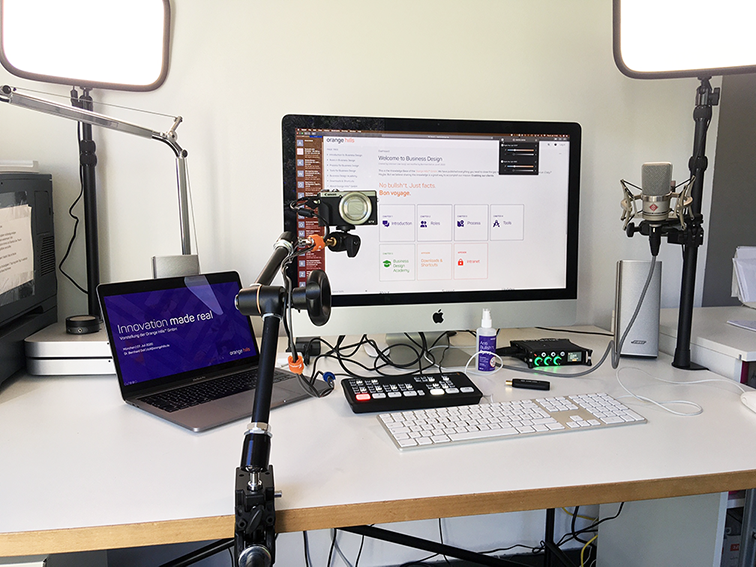
This is what our home office setup looks like:

2. Software Tools
Tool | Comment | |
The standard in the corporate world for instant messaging. Well integrated into other Microsoft services, such as Sharepoint. Frankly speaking, we are not a big fan of it since the UI is not very transparent (even confusing). Nevertheless, we are happy to use it if it makes things easier. ps: A helpful extension is the Microsoft Planner, which offers a visual way to manage tasks...similar to Trello but well integrated into Teams | ||
A great tool for instant messaging with different channels, nice plugins to enhance the functionality and various possibilities to integrate the system into others tools and workflows. | ||
The best video conferencing tool we know. The system allows you to open several channels for breakout sessions, collaboration tools and effects such as virtual whiteboards, screen sharing, chroma keying. The chroma key function is simple with surprisingly good results. Check it out! If you don't have a Zoom "Business" account, you may experience a modest video quality (720p). Zoom has currently problems to cope with the high demand for video streaming these days... | ||
Management software specifically developed for Business Design with great features to set up projects, document results, visualise data from the Discover and Validate phase and work virtually on templates - in real-time. | ||
This software is required to control the Blackmagic Design ATEM Mini switcher. It features two wonderful up- and downstream keyers, an audio mixer and is packed with many other useful features. And it is free. Go get it! | ||
Handy (and free) software tool for both Windows and Mac to insert lower thirds (banners), tickers, timers etc. to your video stream. You need a second computer to feed the stream into your switcher. You can adjust the visuals with CSS commands, e.g.
ps: A way more flexible way to include dynamic content into your video stream is to program your own HTML / CSS pages. Just set the background color to black and position your content in white (or other bright colours) on top. Use a a standard "Luma keyer" to overlay your video with your web page (black will turn into transparent). Your imagination is the limit! Check out our simple "Video Overlay Controller" (screenshot blow) to see how it works...and here are some information on how to setup the software on your computer. | ||
A nice tool for ideation and creativity sessions - pretty much a virtual whiteboard with real-time sync. | ||
This little tool for MacOS allows you to route and mix any input source to any output. Why is this helpful? Feed your Spotify player and your USB microphone right into your video conference software, or blend the sound of Youtube videos and your microphone, well,...the possibilities are endless. | ||
Camtwist + CameraLive | Well, this is the nerdy option on how to connect a DSLR camera to your favourite video conferencing system without any hardware. Check out some basic instructions here... |
3. Hardware / Audio Tools
A good external condenser microphone is the Rode NT. Connect it directly to your computer via USB. Sometimes, you get a delay using USB mics and an external camera, which can be solved only with a mixer and a delay function or a microphone directly hooked up with your camera (instead of your computer), which ensures synched picture and audio. Alternatives:
| |
This is a semi-professional audio mixer, interface and recorder for up to five channels. Well, this device is not essential but provides amazing microphone preamps with a very low noise floor and high-quality (32 bit float) ADDA converters for pristine sound. This thing is amazing and will last forever...it's built like a tank. | |
Headphones | ...and you probably need a pair of headphones. We don't actually care which ones you pick as long as you find them comfortably. Sony, Sennheiser, Beyerdynamic, Bose, Audio-Technica are all good brands. |
4. Hardware / Video Tools
Adapter to connect your DSLR or camcorder to your computer and video conferencing system. Works great for both Windows and MacOS. Keep in mind that 4k videos requires a powerful internet connection with high bandwidth. | |
Easy-to-mount video lights with a good bang for the buck. Can be easily controlled by smart phone app or your computer via WLAN (on/off, temperature, intensity). Take two (left and right) to avoid shadows. ps: If you want to turn your home office into a video studio, these lights might be interesting for you:
They are much better than the Elgato lights, but a bit clumsy. | |
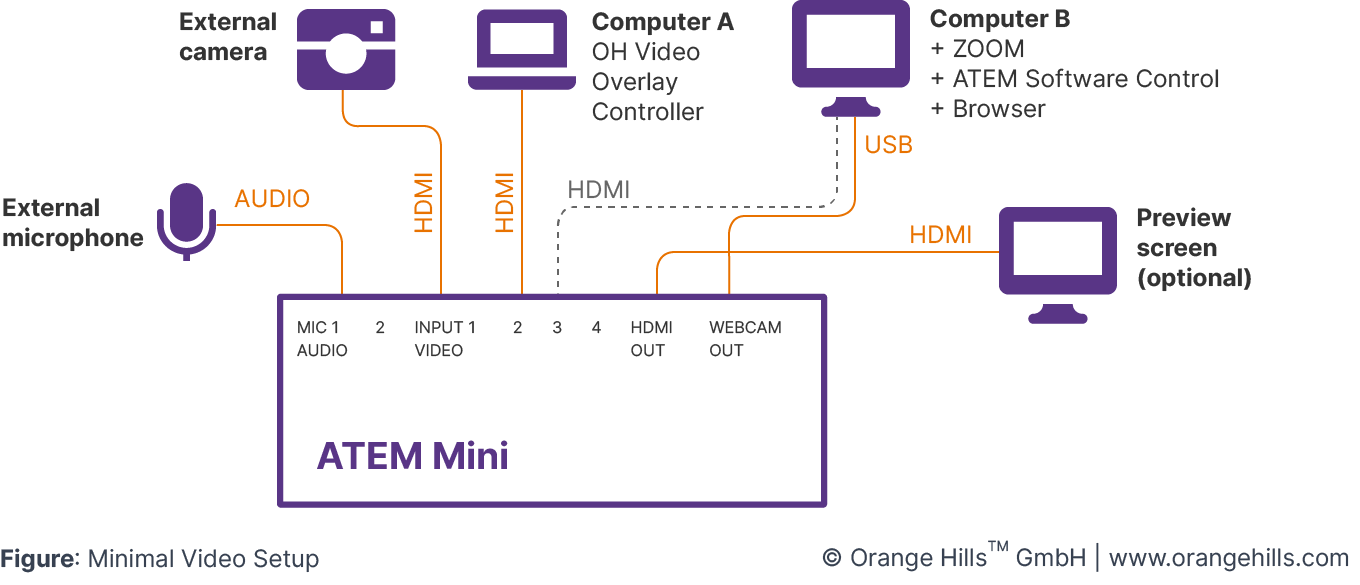
ATEM Mini is a simple yet powerful video switcher. This is great if you need more than one camera for your setup, since it allows you to switch between different HDMI sources. It also comes with a superb green screen function. Just connect a second computer (with HDMI output) to the switcher to show Powerpoint slides (or other visuals) on your green screen. The Pro version allows recording and web streaming (e.g. on YouTube) without any additional hardware, which is super cool. A nice addition to control your ATEM Mini in a Live situation with Macros and Elgato StreamDeck, check out this video. ps: You don't need the Elgato Camlink 4K if you pick up this device. The Camlink 4K is only necessary if you need a preview function for other HDMI sources which are currently not "on air". | |
Well, you don't need this piece of hardware in the first place. However, if you want to record your video streams in high quality (ProRes) and require seamless integration of videos (instead of stills) or animated graphics in your stream, pick up this device! Nicely integrated into the feature set of the ATEM Mini (Pro). ps:
| |
A green screen is a a green "wall" that enables you to "layer" different images together. This comes in handy if you want to show background images for training purposes behind you as an instructor. You can basically use any green blanket or linen or simply pick up the one from Elgato. | |
Manfrotto | The "Magic Arm" as well as the "Super Clamp" and a small ball head (e.g. Manfrotto 496 + Adapter Spigot) are sturdy, high-quality gear to mount your camera, lights and microphones to your desk. Optional: Manfrotto Camera Stand with 3-way pan/tilt head |
This version of the Canon Powershot is compatible with Camlink 4K and features a clean HDMI output, which is essential to use it with Teams, Slack or Zoom. This camera is also compatible to a brand new plug-in for Windows and Mac OS called EOS Webcam Utility that allows you to connect the camera directly to any video conference software (without further hardware). Don't forget to order a 220V power adapter (doesn't need to be the official one from Canon...is a bit pricey)! A good alternative is the SONY Alpha 6300 / 6400 and SONY ZV-1. ps: For longer workshops or training sessions, consider having two cameras in your setup. Camera 1 for you and Camera 2 for close-ups of a whiteboard or other teaching materials. | |
Computer | ...and finally: Streaming HD / 4k videos with proper sound to many people in a video conference requires a good internet connection (> 50 MBit/s) and a proper laptop with RAM (> 8 GB), processor performance (> dual 3 GHz), and a decent graphics card. A simple MacBook is often not capable enough to handle so much data at the same time. The new Apple Mac mini + display, keyboard and mouse is a good deal for this. Optional: A second computer can make things bit easier when it comes to to tweaking your video seem with visual overlays (lower thirds, banners, pictures, etc.). |
5. Setup Guide
The following instructions require a DSLR camera with HDMI output, ATEM Mini and a microphone from this overview:
Connect your DSLR camera via HDMI cable to the ATEM Mini (Channel 1) or Camlink 4K. Make sure you set the HDMI output to "clean" mode. Double check what kind of HDMI cable you need for your camera. Compact cameras require a "Micro HDMI cable".
Provide a stable power supply to your camera (220V adapter)
Repeat step 1. and 2. for other HDMI sources, such as your laptop, smart phone etc.
Hook up the ATEM Mini to your computer. You need a standard USB-C cable (charging and data transmission) for this.
Connect your microphone either directly to your camera or to ATEM Mini audio input (in both cases 3,5 mm mini plug) or via USB to your computer (watch out for delay issues if using USB). If you want to mix your microphone with other audio sources (e.g. Spotify), install Audio Jack or use an external mixer such as Sound Devices MixPre-3 (see overview above), route both signals together and feed it either right into the video conferencing system or into your ATEM Mini.
Set the input source in your operating system (Mac OS or Windows) of your computer to the new USB microphone, camera or ATEM mini (according to your choice at step 5.)
Start your preferred video conferencing system, select ATEM Mini as your camera and you are ready to go...

If you are interested in chroma key / green screen applications: The chroma key functionality of Zoom is surprisingly good. However, you are not very flexible in playing around with different layers (colours, position, size, transitions etc.). For more advanced requirements, we suggest again ATEM Mini, which offers almost a professional set of features.
